
25 New Years Crafts For Kids: Glitter-pocalypse Edition
Ready to ring in the New Year with some kiddie chaos? We’ve got just the thing to keep those little hands busy and out of trouble (well, mostly). These 25 New Year’s crafts for kids will have you covered from confetti to countdowns.
Get ready to unleash your inner glitter monster and embrace the joyful mess that comes with pint-sized party prep.
You’ll be amazed at how quickly your living room can transform into a sparkling wonderland of pipe cleaner party hats and cardboard noisemakers. Just remember to hide the good scissors!
25 New Years Crafts For Kids (‘Cause its 2025!)
1. Pine Cone Penguins
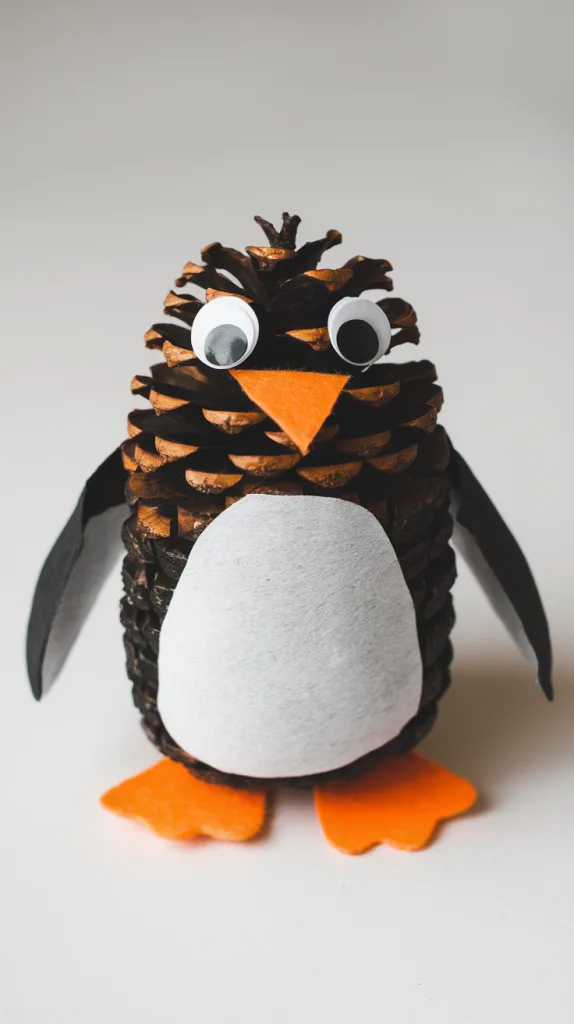 Ready to waddle into some crafty fun? Pine cone penguins are here to steal the show and your heart! These adorable little guys are the perfect way to kick off your New Year’s crafting extravaganza.
First things first, you’ll need to gather your supplies. Hunt down some pinecones – the bigger, the better for your penguin’s rotund body. Don’t forget black and white paint, googly eyes, and some orange, white and black, felt for those cute little beaks, arms and feet.
Now, let’s get painting! Slather that pinecone in black paint, leaving just a white tummy area. It’s like giving your penguin a stylish tuxedo for the New Year’s party. If you have little kids, you can glue on a felt white tummy as well since painting the pinecone can be a challenge.
Once the paint dries, it’s time to bring your penguin to life. Glue on those googly eyes – the bigger and wackier, the better. Cut a tiny triangle from the orange felt for the beak. Stick it on and watch your penguin’s personality emerge.
For the finishing touch, cut out some little orange feet. Glue them to the bottom of your pinecone. You can use black and white felt to create wings and glue them to the sides, and voila! Your penguin is ready to march into the New Year with pizzazz.
Display your pine cone penguins on the mantle or use them as quirky table decorations. They’re sure to be a hit with kids and adults alike. Who knows, you might even start a penguin colony before the night is through!
2. Glittery Firework Pencils
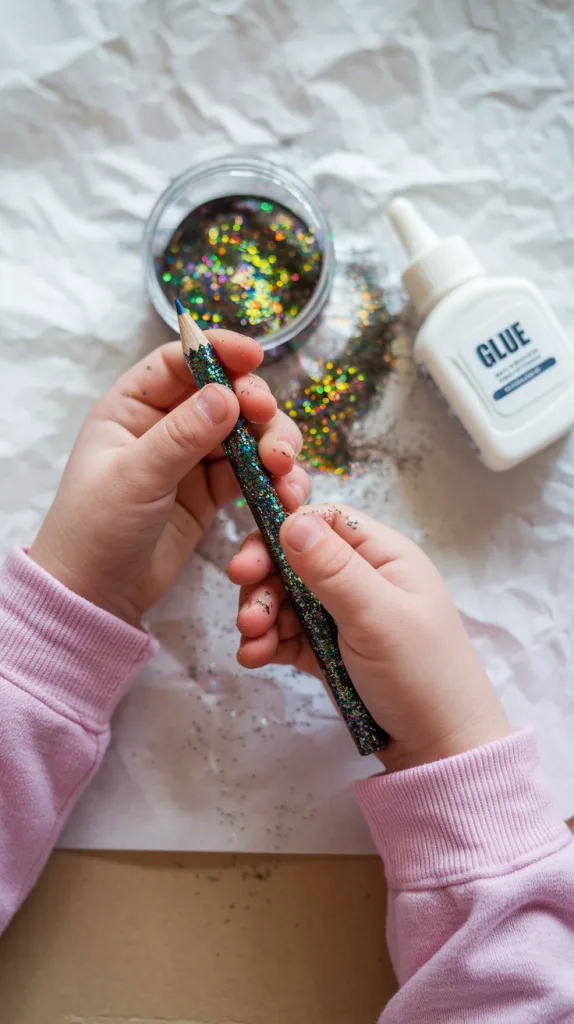 Ready to make your pencils sparkle like the night sky on New Year’s Eve? These glittery firework pencils are just the ticket! You’ll be the coolest kid in class when you whip out these bad boys.
First, gather your supplies. You’ll need some plain pencils, glue, and glitter in various colors. Don’t forget to protect your workspace with newspaper, unless you want your whole house to look like a disco ball.
Now, let’s get crafty! Apply a thin layer of glue to the pencil, starting from the eraser end. Work your way down in sections, sprinkling different colors of glitter as you go. It’s like creating a tiny, sparkly rainbow on a stick!
As you sprinkle the glitter, make sure to rotate the pencil. This way, you’ll cover all sides evenly. You don’t want a lopsided firework, do you?
Once you’ve covered the entire pencil, gently tap off any excess glitter. Be careful not to sneeze, or you might end up looking like a glitter bomb victim!
Set your masterpiece aside to dry completely. This is the perfect time to practice your patience or, you know, make more glittery pencils.
When they’re dry, give them a gentle shake to remove any loose glitter. Now you’re ready to dazzle everyone with your firework-inspired writing tools!
Use these sparkly pencils to write your New Year’s resolutions or to take notes in class. Just be prepared for some jealous looks from your classmates. They’ll be green with envy – or maybe that’s just the glitter reflecting off their faces!
3. Shiny CD Spinner
 Ready to add some sparkle to your New Year’s festivities? Look no further than your dusty CD collection! Time to turn those forgotten discs into dazzling decorations that’ll have your kids spinning with joy.
Grab a CD, some colorful markers, and let your imagination run wild. Draw funky patterns, write silly New Year’s resolutions, or sketch your family’s faces (bonus points for Dad’s bald spot).
Now for the fun part: punch a hole in the center and thread a string through. Voila! You’ve got yourself a homemade disco ball that would make even John Travolta jealous.
Hang these shiny spinners around the house and watch as they catch the light, creating a mesmerizing display. It’s like your own personal dance party, minus the embarrassing moves.
Pro tip: if you’re feeling extra crafty, add some glitter or sequins. Because nothing says “Happy New Year” quite like finding sparkles in your carpet for the next six months.
Remember, the more CDs you use, the more excuses you have to blast “Stayin’ Alive” while crafting. It’s a win-win situation, really.
So, gather your little ones and get spinning! These CD crafts are sure to be a hit, and who knows? You might just discover your child’s hidden talent for creating the world’s tiniest mirror balls.
4. Confetti Poppers of Joy

Get ready to ring in the New Year with a bang—well, more of a pop! These confetti poppers are a blast to make and even more fun to use when the clock strikes midnight.
You’ll need some empty toilet paper rolls, markers, wrapping paper, gold balloons, and confetti. Decorate the cardboard tubes in fun New Years Eve colors. You can use markers, paint, tissue paper, or string.
Cut the necks off the balloons and stretch them over one end of each roll. Fill the tubes with confetti, but don’t go overboard—you’re not trying to recreate a snowstorm here.
To use your poppers, simply pull back on the balloon end and let it snap. Watch as a shower of colorful confetti rains down on unsuspecting family members. Just be prepared for the inevitable cleanup—you might be finding bits of sparkle in your carpet until next New Year’s Eve.
For an extra giggle, try using themed confetti. Tiny paper clocks, miniature top hats, or even small cutouts of your family’s faces will add a personal touch. Imagine Grandma’s surprise when she’s showered with dozens of tiny versions of herself!
Remember, confetti poppers are best used outdoors or in areas you don’t mind getting a bit messy. Your vacuum cleaner will thank you for your consideration.
And hey, if you run out of confetti, there’s always the option of using shredded New Year’s resolutions. They’ll probably end up on the floor by February anyway!
5. Paper Plate Party Hats
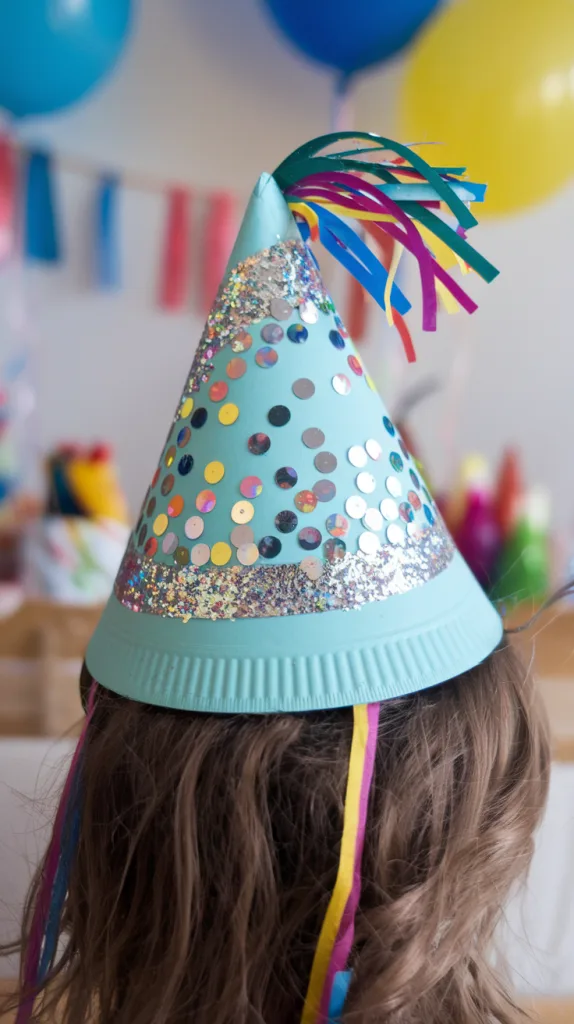 Ready to turn your New Year’s bash into a hat-tastic extravaganza? Look no further than your kitchen cupboard for the star of the show – paper plates!
Grab those flimsy discs and prepare to transform them into the most fabulous headgear this side of Times Square. You’ll be the envy of all your miniature party-goers with these DIY delights.
Start by cutting the plate in almost half. Now, don’t go wild and slice your fingers – safety first, party animals! Roll the paper hat into a triangle so that there is a point at top. Decorate the outer rim with glitter, sequins, or whatever sparkly bits you can find in your craft drawer.
Next, attach some elastic to keep these beauties perched atop your little one’s noggin. You wouldn’t want their new fashion statement flying off at midnight, would you?
For extra pizzazz, add streamers or ribbons to the pointed end. It’s like a party on your head! Your kids will love swishing and swaying, looking like human confetti cannons.
Don’t forget to write the new year on the front. It’s not just a hat, it’s a time machine… sort of. Your little ones can pretend they’re from the future, warning everyone about the great cupcake shortage of 2025.
These hats are so easy to make, you might find yourself crafting one for the family pet. Who says Fluffy can’t join in on the New Year’s fun? Just be prepared for some confused tail-wagging.
6. Sparklin’ Star Wands
 Ready to wave some magic into the New Year? These sparklin’ star wands are just the ticket! You’ll feel like a celestial conductor, orchestrating a symphony of wishes and dreams.
First, grab some cardboard and cut out star shapes. Don’t worry if they look more like potatoes with points – it’s all part of the charm! Now, here’s where the real fun begins.
Slather those stars in glue and go to town with the glitter. You’ll be finding sparkles in your socks for weeks, but it’s worth it for the dazzling result. Stick your glittery creations onto wooden dowels or even just sturdy twigs from the backyard.
You can add some streamers or ribbons for added flair. They’ll flutter behind your wand as you cast spells like “Make veggies taste like candy” or “Turn homework into pizza.” Hey, a kid can dream, right?
Now you’re ready to wave in the New Year with style. Just be careful not to poke anyone’s eye out during the countdown. Nothing ruins a party like an accidental wand-stabbing!
7. Bubble Wrap Stomp Painting
 Get ready to unleash your inner Jackson Pollock with this hilariously messy New Year’s craft! Bubble wrap stomp painting is perfect for kids who love to make a splash (or splat) with their art.
First, you’ll need to gather your supplies. Grab some bubble wrap, paint, a large sheet of paper, and your most stomptastic shoes. Don’t forget to wear your oldest clothes—things are about to get wild!
Lay out your paper on a flat surface, preferably outdoors or in a garage. You don’t want to explain to Mom why the living room looks like a rainbow exploded.
Now comes the fun part. Squirt different colors of paint onto the bubble wrap. Go crazy with it! The more colors, the merrier.
Carefully place the paint-covered bubble wrap onto your paper, bubble side down. Take a deep breath, channel your inner elephant, and start stomping!
As you dance and stomp on the bubble wrap, you’ll hear satisfying pops and feel the paint squishing beneath your feet. It’s like bubble wrap meets Dance Dance Revolution!
When you’ve finished your stomping session, carefully peel back the bubble wrap to reveal your masterpiece. Voila! You’ve created a unique, bubbly texture that’s sure to impress.
Let your creation dry, and then hang it up to ring in the New Year with style. Who knows? You might just start a new artistic movement: Bubble Wrap Expressionism!
8. Festive Fingerprint Fireworks
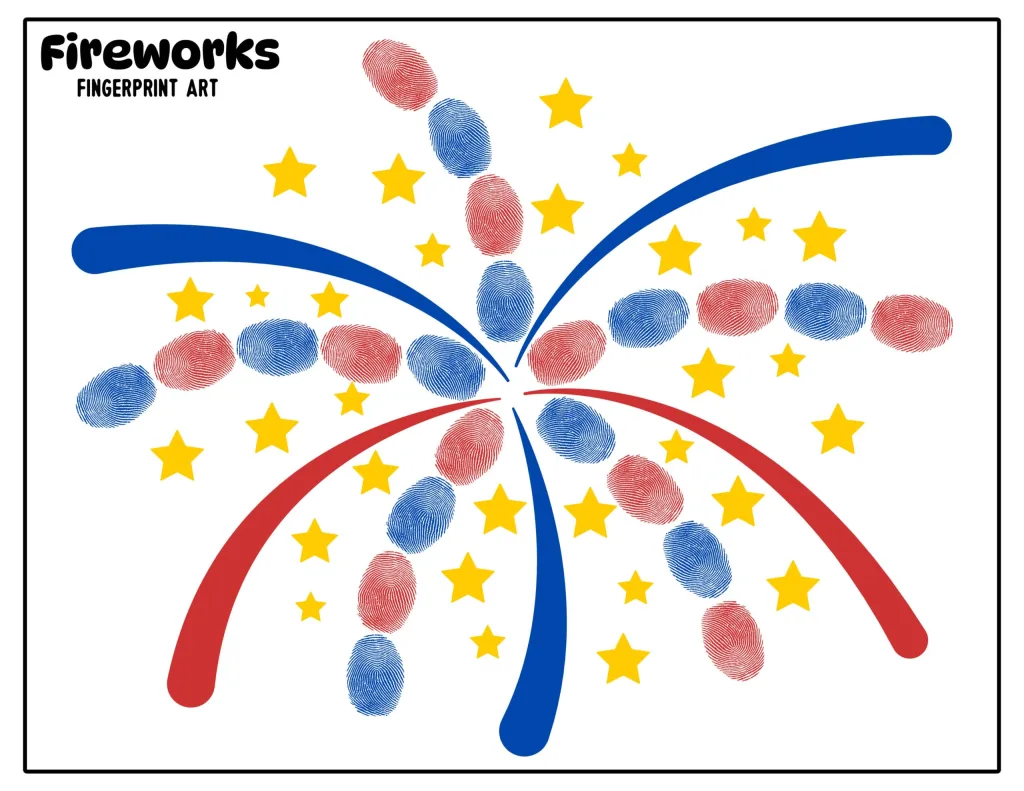 Get ready to make your fingers do the talking… or rather, the exploding! This craft is all about creating colorful fireworks using nothing but your tiny digit-friends and some paint.
First, grab your favorite vibrant colors. You’ll want to channel your inner Jackson Pollock, minus the whole “tortured artist” vibe. Dip your fingertips into the paint and prepare for some fingerprint magic.
Now, here’s where you become a finger-painting Picasso. Press your paint-covered digits onto paper in a burst pattern. Don’t worry if it looks more like a blob than a boom – that’s part of the charm!
Keep adding fingerprints in different colors, radiating outward from the center. It’s like your fingers are having their own little New Year’s party on the paper. Just don’t let them get too rowdy!
For an extra pop, add some glitter while the paint is still wet. Because let’s face it, everything’s better with a little sparkle. It’s like bedazzling for your artwork!
Once dry, you can display your masterpiece proudly. It’s a great way to show off your “explosive” artistic talents without any actual pyrotechnics involved. Safety first, fun second!
This craft is perfect for kids of all ages. Even the tiniest tots can join in, though you might want to have some wet wipes handy. Finger painting can quickly turn into face painting if you’re not careful!
9. Noisemaker Cups with Attitude
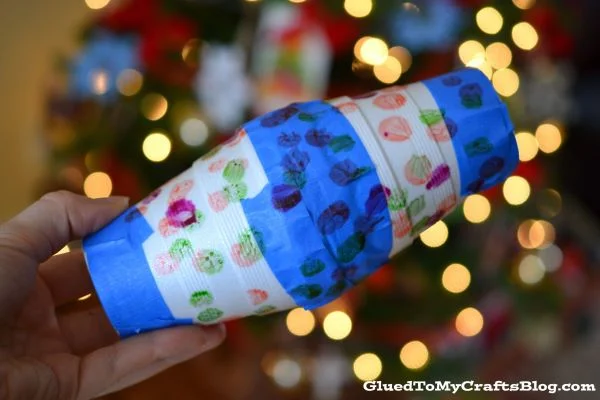
Ready to ring in the New Year with a bang? These sassy noisemaker cups are just what you need to add some personality to your celebration. Forget those boring store-bought noisemakers – it’s time to get crafty and create your own unique party favors.
Start with plain plastic cups and let your imagination run wild. Grab some markers, stickers, and googly eyes to give your cups some serious attitude. Why settle for a plain old noise when you can have a cup that talks back?
Draw funny faces, add silly mustaches, or even create mini monsters. The quirkier, the better! Your kids will love coming up with wacky expressions for their noisemaker pals.
Once you’ve decorated the cups, it’s time to make some noise. Poke a small hole in the bottom of each cup and thread a piece of string through it. Tie a bead or button to the end inside the cup.
When you pull the string, the bead will hit the bottom of the cup, creating a satisfying “pop” sound. It’s like your cup is sticking its tongue out at the old year!
These noisemaker cups aren’t just for New Year’s Eve. They’re perfect for birthdays, school events, or any time you want to add a little chaos to your day. Just be prepared for an onslaught of cup-based comedy from your little jokesters.
So gather your crafting supplies and get ready to create some noise with attitude. Your New Year’s celebration just got a whole lot more entertaining!
10. Wrapping Paper Roll Binoculars for Counting Down Stars
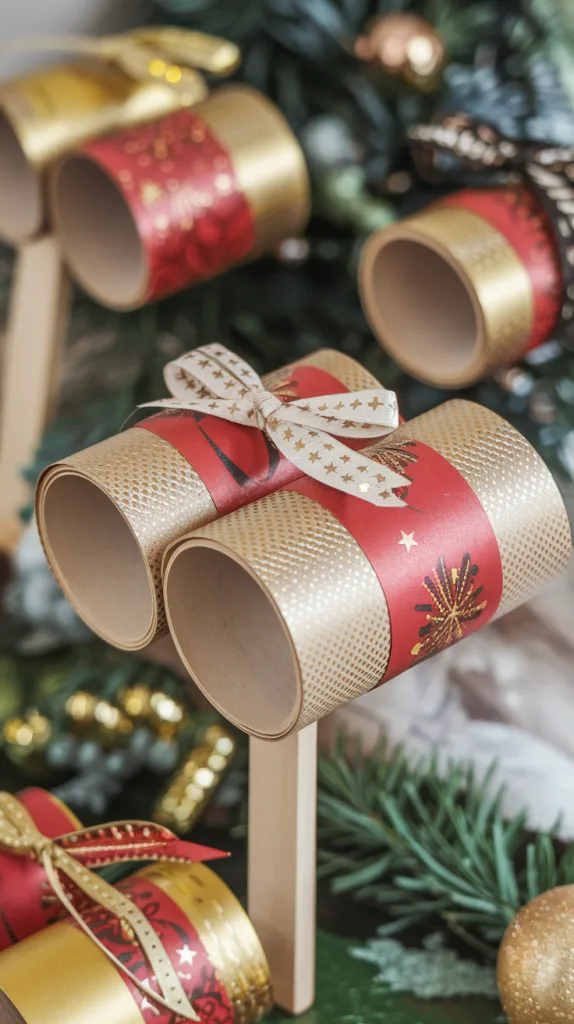 Ready to gaze at the night sky like a pint-sized astronomer? Grab those empty wrapping paper rolls from the holidays and prepare for a stellar New Year’s Eve adventure!
First, paint those cardboard tubes with some sparkly silver or gold paint or wrap them in paper. You’ll want them to shine brighter than your neighbor’s tacky light display.
Next, get creative with the decorations. Stick on some star-shaped stickers or draw constellations with glitter glue. Who says Orion’s Belt can’t have a few extra rhinestones?
Now for the tricky part: attaching the tubes. Use some strong tape or glue to stick them together side by side. Just make sure they’re aligned properly, or you might end up counting the same star twice!
You can add a strap, or add a popsicle stick or small piece of sanded wood to the bottom to hold on to. Cut a piece of ribbon long enough to fit around your little stargazer’s neck. Attach it to the sides of your new “binoculars” and voila!
As the clock ticks closer to midnight, send your kiddos outside to count down the stars. They can pretend each twinkling light is another second closer to the New Year.
And if you live in a city with too much light pollution? No worries! Stick some glow-in-the-dark stars on the ceiling and let the indoor countdown begin.
11. Recycled Party Blowers
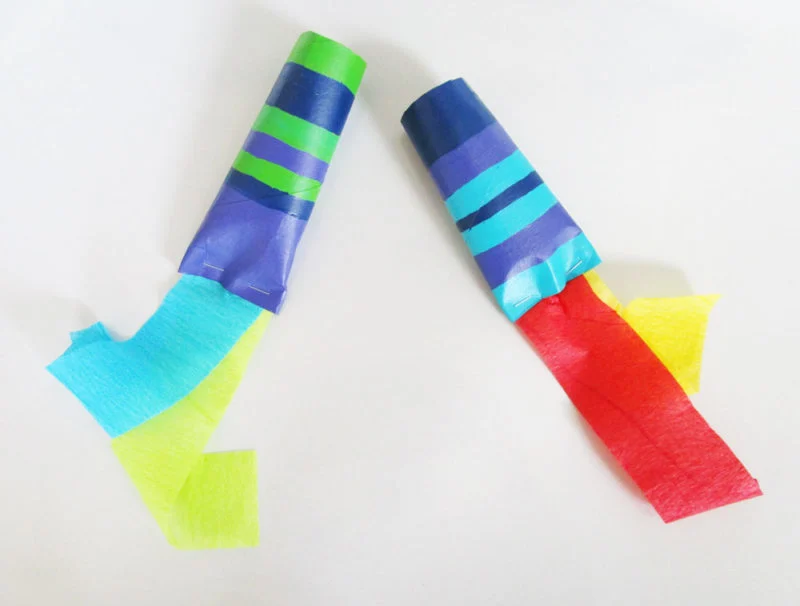
Ready to make some noise this New Year’s Eve? Look no further than your recycling bin! With a few simple materials, you can create festive party blowers that are both eco-friendly and fun.
Start by gathering some empty toilet paper rolls. You know, those cardboard tubes you’ve been hoarding for… reasons. Now’s their time to shine!
Grab some colorful paper or leftover wrapping paper from Christmas. Cut it to size and wrap it around the toilet paper roll. Secure it with tape or glue. Voila! You’ve just upcycled your way to party town.
Now for the noisemaking part. Cut a piece of wax paper slightly larger than the end of your tube. Secure it with a rubber band, leaving it a bit loose. This will be your buzzer.
To make the mouthpiece, cut a small hole in the other end of the tube. You can decorate it further with stickers, glitter, or whatever tickles your crafty fancy.
When you blow into the mouthpiece, the wax paper will vibrate, creating that classic party blower sound. Just try not to startle the cat when testing your creation.
These DIY blowers are perfect for kids to make and enjoy. Plus, they’re a great way to teach about recycling while having a blast. Who knew saving the planet could be so noisy?
12. Recycled Laundry Bottle Elephants
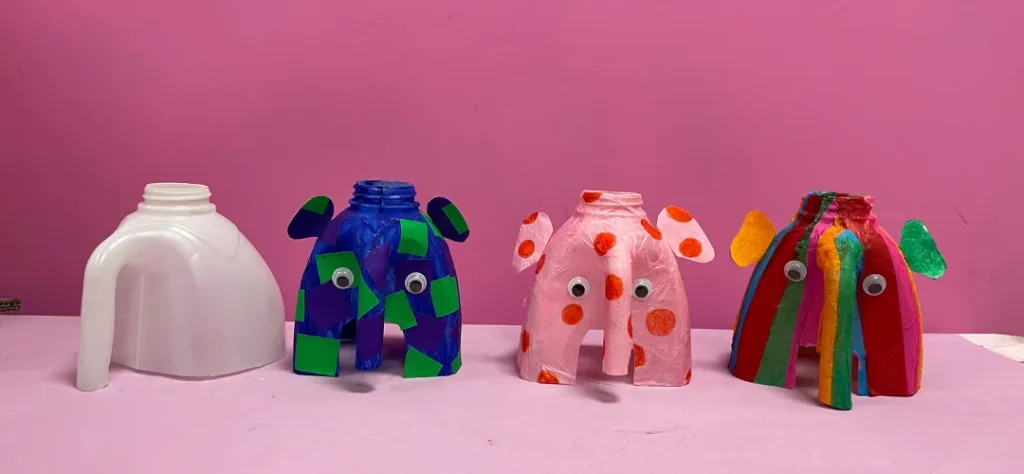
Ready to turn your old laundry detergent container into a jumbo-sized upcycling project? Start by thoroughly cleaning the empty container and letting it dry.
Paint the container gray to mimic an elephant’s natural look, or go wild with bright colors for a playful twist. The spout of the container will serve as the base for the trunk, so cut a strip of cardboard or plastic from an old cereal box or another recyclable item.
Curl the strip into a spiral and glue it to the spout to create a whimsical trunk. Next, cut out large ear shapes from craft foam or cardboard and attach them to the sides of the container.
For the finishing touches, glue on some oversized googly eyes above the spout to bring your elephant to life and add buttons or bottle caps to the bottom for sturdy feet. Want a tail?
Tie a piece of yarn or string to the back of the container. This fun and eco-friendly craft is a perfect project for the whole family, creating a unique elephant pal that’s equal parts silly and sustainable!
These playful pachyderms are perfect for New Year’s decorations. Paint them in bright colors or add glitter for a festive touch. Your Silly Container Elephants will be the talk of the party!
Remember, crafting should be fun. If your elephant looks more like a wonky giraffe, just go with it. Imagination is the name of the game here!
13. Lava Lamps in a Jar
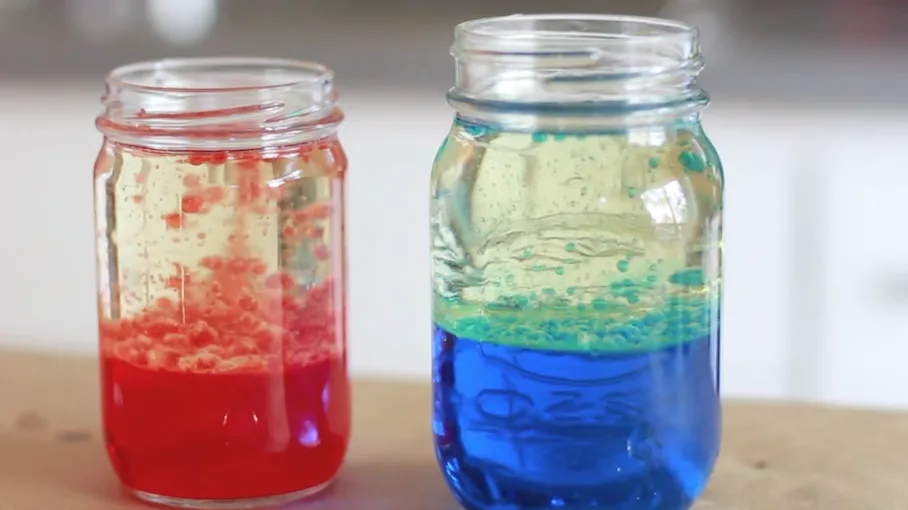 Ready to bring some groovy vibes to your New Year’s celebration? Look no further than these DIY lava lamps in a jar! You’ll feel like a mad scientist as you concoct these psychedelic creations.
Gather your supplies: clear jars, water, vegetable oil, food coloring, and effervescent tablets. Pro tip: raid your parents’ medicine cabinet for those fizzy antacids. They’re not just for tummy aches anymore!
Fill your jar about 1/4 full with water. Now, here’s where the magic happens. Add a few drops of food coloring and watch it swirl like a tiny underwater tornado. Go wild with colors – the more, the merrier!
Next, pour vegetable oil into the jar until it’s nearly full. Don’t worry if you spill a little; you’re basically a scientist now, and lab coats are always a bit messy.
Time for the grand finale! Break an effervescent tablet into small pieces and drop them in. Watch in amazement as colorful blobs rise and fall like they’re doing the disco.
As the bubbles dance up and down, you might find yourself hypnotized. Don’t be surprised if you start hearing “Stayin’ Alive” playing in your head. These lava lamps are groovier than your dad’s old bell-bottoms!
Want to kick it up a notch? Try adding glitter to your concoction. It’s like a tiny dance party in a jar. Just don’t blame us if you can’t stop staring at your creation all night long.
Remember, these lava lamps are for observation only. No matter how thirsty you get during your New Year’s bash, resist the urge to take a sip. Oil and antacids don’t make for a tasty midnight toast!
14. Wacky Whistle Straws

Get ready to toot your own horn with these fun and funky whistle straws! You’ll be the life of the New Year’s party with these noisemakers that double as drinking straws.
Start by gathering some colorful plastic straws and safety scissors. Cut small slits near one end of each straw, about an inch apart. Don’t go too crazy – you want it to still function as a straw!
Now for the wacky part. Grab some lightweight decorations like pom-poms, feathers, or even tiny party hats. Stick them onto the straw using non-toxic glue. Be careful not to block the slits you made earlier.
Time to test your creation! Blow gently through the decorated end and listen for that sweet whistle. If it’s not working, try adjusting the size of your slits. Too big and you’ll just get air, too small and you’ll burst a lung trying to make a sound.
Want to take it up a notch? Add some streamers or ribbons to the bottom of your straw. When you blow, they’ll flutter and dance like tiny party guests. Just don’t inhale too hard, or you might end up with a mouthful of confetti!
These wacky whistle straws are perfect for counting down to midnight. Plus, they’re a great way to keep the kids busy while you try to remember the words to Auld Lang Syne. Happy crafting and happy tooting!
15. Sock Puppet Resolution Buddies
Ready to make some quirky companions for your New Year’s resolutions? Grab those lonely socks from the depths of your drawer and give them a new purpose in life!
Start by choosing a sock that matches your personality. Maybe it’s striped, polka-dotted, or covered in unicorns. No judgment here – the quirkier, the better!
Now, it’s time to bring your sock to life. Glue on some googly eyes, because nothing says “I’m watching you stick to your resolutions” like a pair of wobbly peepers.
Give your puppet a mouth using felt or markers. Will it be a cheerleader with a big smile or a stern taskmaster with a straight line? The choice is yours!
Add some flair with yarn hair, a tiny hat, or even a miniature scarf. Your resolution buddy should be as stylish as it is supportive.
Now comes the fun part – naming your sock puppet! Choose a name that embodies your resolution. “Gym Jim” or “Salad Sally” might be just the motivation you need.
Practice your ventriloquism skills and have your puppet give you pep talks. “You’ve got this!” sounds way more convincing coming from a sock, trust us.
When you’re feeling tempted to break your resolution, let your puppet do the talking. It’s harder to argue with a sock, especially one with googly eyes.
Create a whole family of resolution buddies if you’re feeling ambitious. They can have puppet meetings to discuss your progress and plan surprise parties for your successes.
Remember, laughter is the best motivation. So when your sock puppet tells you to put down that cookie, at least you’ll be giggling while you do it.
16. Balloon Pom-Pom Launchers
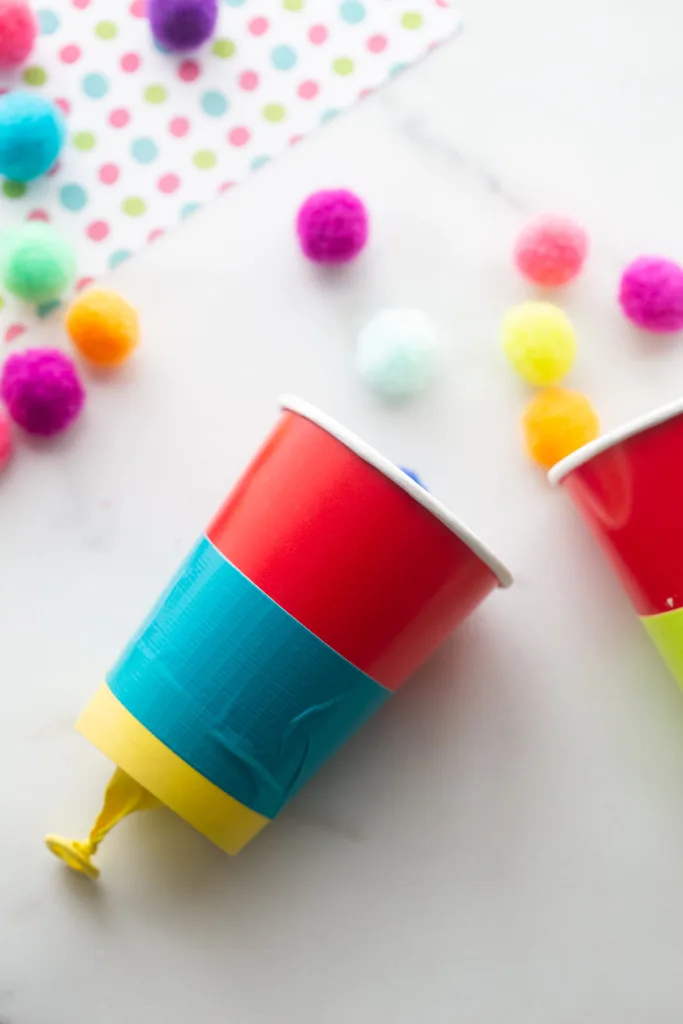
Get ready to ring in the New Year with a bang—or rather, a poof! Balloon pom-pom launchers are the perfect craft to add a dash of silliness to your festivities.
You’ll need balloons, plastic cups, and those fluffy little pom-poms that always seem to end up stuck to your socks. Cut the bottom off the cup, tie the balloon over the cut end, and voila! You’ve got yourself a launcher.
Now comes the fun part. Load a pom-pom into the cup, pull back on the balloon, and let it rip! Watch as colorful pom-poms soar through the air like tiny, fuzzy fireworks.
Challenge your kids to a distance contest. Who can launch their pom-pom the farthest? Just be prepared for the inevitable “accidental” misfires in your direction.
For an extra festive touch, use metallic pom-poms. They’ll catch the light as they fly, creating a dazzling display. It’s like confetti, but without the dreaded clean-up.
Want to up the ante? Set up targets around the room. Suddenly, your living room is transformed into a carnival game. Step right up and test your aim!
Remember, safety first. Remind the little ones not to aim at faces or anything breakable. Unless, of course, you’re looking for an excuse to redecorate in the New Year.
When midnight strikes, forget the noisemakers. A synchronized pom-pom launch is the new way to celebrate. It’s quieter, more colorful, and way more fun.
So, gather your supplies and get ready for some laughs. With these balloon pom-pom launchers, you’re guaranteed to start the New Year with a smile—and maybe a few pom-poms stuck in your hair.
17. Jolly Jelly Bean Jars
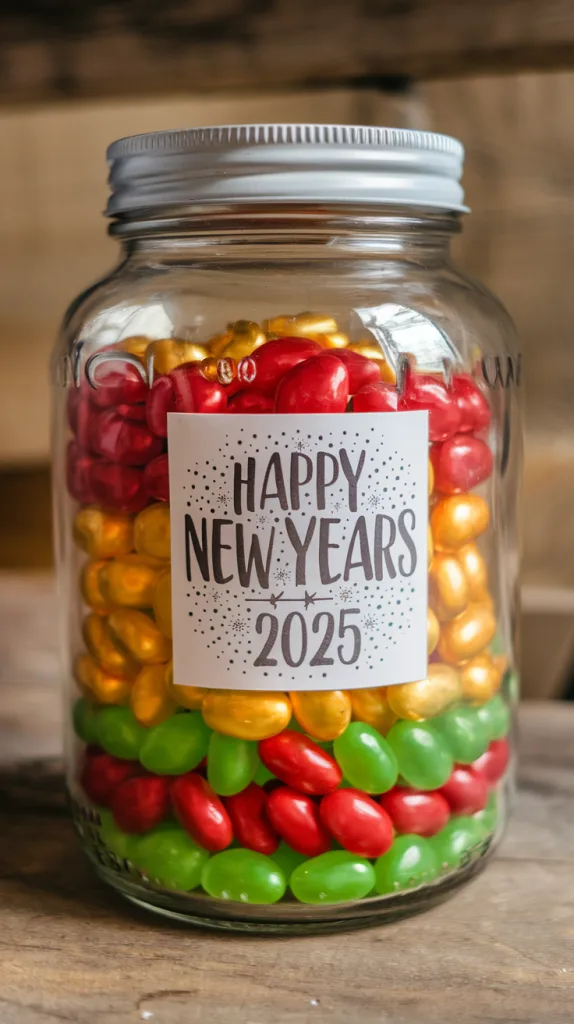 Ready to add some sweetness to your New Year’s celebration? Get your hands on some empty glass jars and prepare for a colorful adventure!
You’ll need jelly beans in various hues, preferably matching the festive season. Think reds, greens, golds, and silvers. Don’t worry if you sneak a few while crafting – we won’t tell!
Start by cleaning those jars until they sparkle like Times Square on New Year’s Eve. Now comes the fun part: layering those beans! You can create stripes, swirls, or even spell out “2025” if you’re feeling extra fancy.
Got some ribbon lying around? Wrap it around the jar’s neck for that extra pizzazz. Feeling creative? Slap on a personalized label. “Billy’s Bean Bonanza” has a nice ring to it, doesn’t it?
These jolly jelly bean jars make perfect gifts for friends and family. Plus, they double as excellent noise makers when the clock strikes midnight. Just don’t shake them too hard, or you might start a jelly bean avalanche!
Remember, the key to this craft is having fun. If you end up with more beans in your belly than in the jar, well, that’s just part of the process. Happy crafting, you jelly bean genius!
18. Button New Year Magnets
 Ready to button up your New Year’s craft game? These adorable button magnets will stick to your fridge like a resolution sticks to… well, let’s not get ahead of ourselves.
Grab a handful of colorful buttons and some small round magnets. You’re about to become a button magnet maestro. Don’t worry, no sewing skills required here!
First, choose buttons that scream “Happy New Year!” Think sparkly, shiny, or numbers that spell out the upcoming year. Your fridge is about to get a fashionable makeover.
Now, get your hands on some strong glue. You’ll need it to attach those magnets to the back of your buttons. Just a dab will do – we’re not building a spacecraft here.
While the glue dries, practice your New Year’s countdown. By the time you reach “Happy New Year!” your magnets should be ready for action.
Voila! You’ve just created a set of festive fridge decorations. Arrange them to spell out “2025” or create a whimsical pattern. Your refrigerator will be the talk of the town.
These button magnets are perfect for holding up your kids’ artwork or that takeout menu you swear you’ll stop using this year. Who knew buttons could be so multi-talented?
Remember, if anyone asks where you got these fabulous magnets, just say they’re “homemade with love and a dash of humor.” They don’t need to know about the glue mishaps.
19. Cheery Clothespin Countdown
 Ready to ring in the New Year with a craft that’s both fun and functional? Look no further than the Cheery Clothespin Countdown! This adorable project will have your little ones bouncing with excitement as they tick off the days until the big celebration.
Gather up some colorful clothespins and a piece of festive ribbon. You’ll want to snag 31 clothespins if you’re starting on December 1st, or adjust accordingly if you’re fashionably late to the crafting party.
Now, let your kiddos go wild decorating each clothespin. Glitter, stickers, and tiny pom-poms are all fair game here. Just be prepared for a sparkly explosion in your crafting area!
Once your clothespins are bedazzled to perfection, help your little artists clip them onto the ribbon in numerical order. Hang this masterpiece where everyone can see it, and watch as the anticipation builds with each passing day.
Every morning, your kids will dash to remove a clothespin, bringing them one step closer to the New Year’s bash. It’s like an advent calendar, but with 100% more mess and giggles.
Fair warning: you might find yourself joining in on the countdown fun. There’s something oddly satisfying about unclipping those little wooden wonders. Just try not to get caught sneaking extra clothespins off when no one’s looking!
20. Felt Donut Dreamcatchers
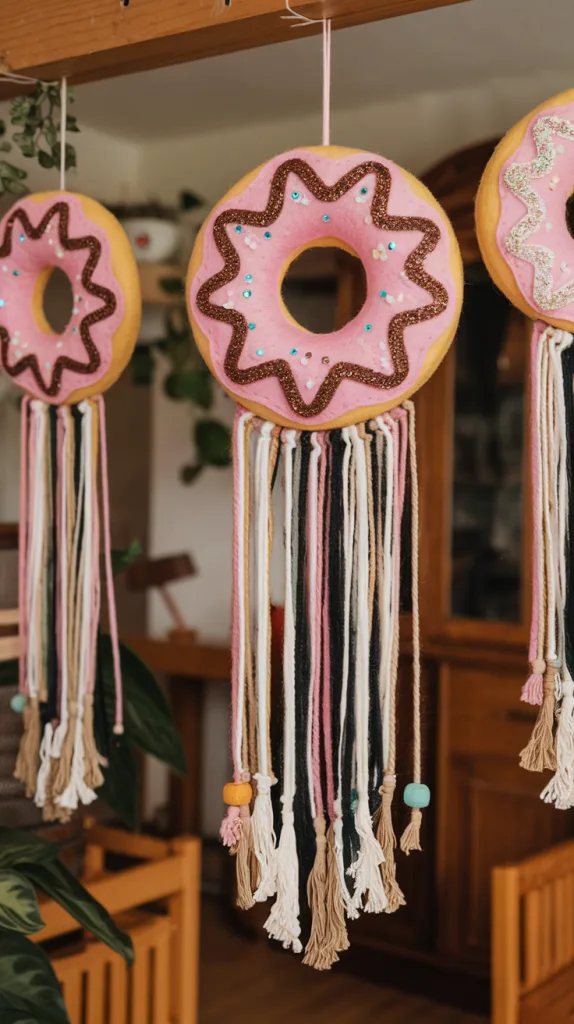 Ready to catch some sweet dreams? Grab your art supplies and get ready to create the most delicious-looking dreamcatchers ever! These doodle donut dreamcatchers are the perfect way to ring in the New Year with a touch of whimsy and a whole lot of sugar-coated creativity.
Start by gathering colorful embroidery hoops, yarn, and felt in various shades of pink, brown, and white. You’ll also need some markers, glitter glue, and sequins for that extra sparkle. Because let’s face it, what’s a donut without some sprinkles?
Cut out large donut shapes from felt and attach them to the embroidery hoops. Now comes the fun part – decorating! Let your imagination run wild as you doodle icing patterns, sprinkles, and maybe even a bite mark or two. Who says you can’t eat your dreamcatcher?
Hang some yarn from the bottom of the hoop to create the classic dreamcatcher look. Add beads or small felt donuts to the hanging strings for an extra touch of sweetness. Your bedroom will never look more appetizing!
These doodle donut dreamcatchers are not just adorable decorations; they’re also great conversation starters. Imagine telling your friends that you’re on a strict dream diet – only the sweetest ones allowed through!
As you craft, don’t forget to make some donut-related wishes for the New Year. Maybe you’ll dream up the perfect recipe for zero-calorie donuts. Hey, a kid can dream, right?
21. Play-Doh Countdown Clocks
Get ready to squish, mold, and shape your way into the New Year with these fun Play-Doh countdown clocks! You’ll be the envy of all your friends when they see your colorful creations ticking away the final moments of 2024.
Start by grabbing your favorite Play-Doh colors. Go wild! The more vibrant, the better. You’re not just making a clock; you’re crafting a masterpiece that would make Salvador Dalí’s melting clocks look like boring old sundials.
Roll out a big circle for the clock face. Don’t worry if it’s not perfect – who says time has to be round anyway? Now comes the tricky part: creating the numbers. You could go traditional with 1 to 12, or live on the edge and count down from 60 to 1.
For the hands, roll out some thin snakes of Play-Doh. Make them long enough to reach the edge of your clock face. Stick them in the center, and voila! You’ve got yourself a clock that’s more exciting than watching paint dry.
Want to add some pizzazz? Why not create tiny Play-Doh party hats or noisemakers around the edge? It’s your clock, so go nuts! Just remember, if you get too carried away, you might miss midnight altogether.
As the final seconds of the year tick away, you can dramatically move the hands of your Play-Doh clock. Just be careful not to squish your masterpiece in all the excitement. And if you do? Well, that’s what New Year’s resolutions are for – “I resolve to improve my Play-Doh clock-making skills in 2025!”
22. Giggle Garland of Gigantic Goals
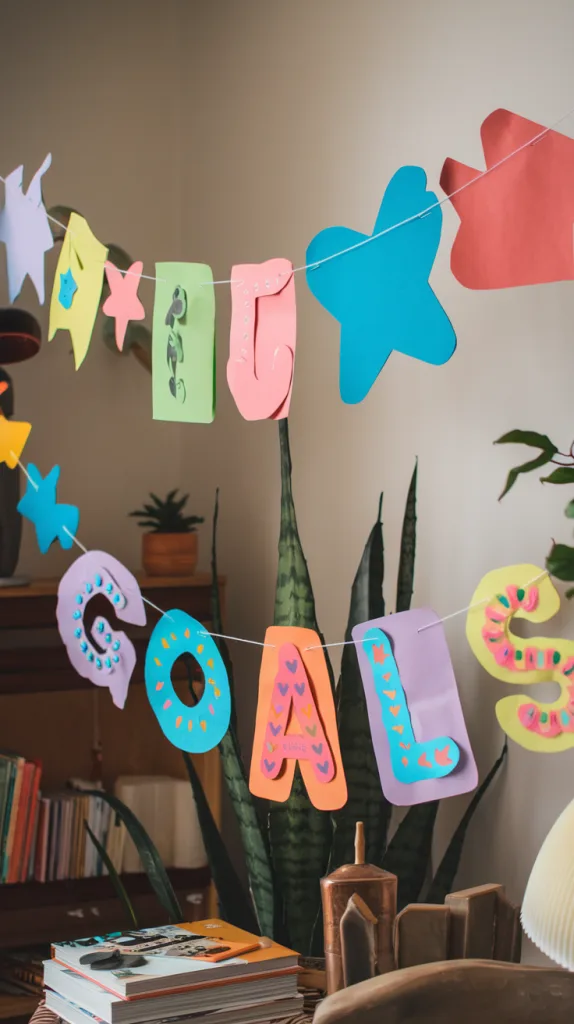 Ready to set some hilariously huge goals for the new year? Get your giggles on with this Giggle Garland of Gigantic Goals craft! It’s time to dream big and laugh even bigger.
Grab some colorful paper, scissors, and your wildest imagination. Cut out large, funky shapes – the wackier, the better. Think oversized stars, wonky hearts, or even dinosaur-shaped dreams!
On each shape, write down a goal that’s so outrageous it makes you chuckle. How about “Teach my cat to speak French” or “Invent a machine that turns broccoli into ice cream”? The sillier, the better!
String these gigantic goal shapes together to create your very own Giggle Garland. Hang it up where you can see it every day and let the laughter begin.
As you work on your real New Year’s resolutions, glance at your Giggle Garland for a mood boost. Who knows? Maybe some of those crazy ideas will inspire some genuinely creative goals.
Remember, laughter is the best way to kick off a new year. So go ahead, make your Giggle Garland of Gigantic Goals and start your year with a hearty chuckle!
23. Retro Paper Fortune Tellers
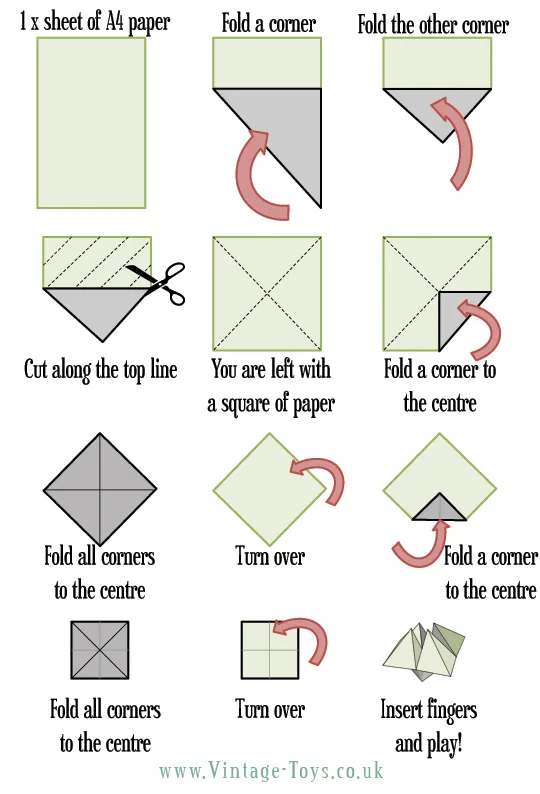
Remember those folded paper fortune tellers from your school days? Well, it’s time to bring them back for a nostalgic New Year’s craft! Your kids will love creating these retro gems, and you might just find yourself joining in on the fun.
Start by folding a square piece of paper into a neat little triangle. Now, unfold it and flip it over. Fold it into quarters, then unfold again. You’re on your way to fortune-telling greatness!
Next, fold each corner into the center. Flip it over and repeat. You’ll end up with a smaller square that’s just begging to be decorated. This is where the real magic happens!
Let your kids go wild with colors, glitter, and New Year’s-themed drawings. They can write silly fortunes inside, like “You’ll eat 365 cookies this year” or “Your bedroom will clean itself in 2025.”
Once it’s all decorated, fold it into the classic fortune teller shape. Slide your thumbs and index fingers into the pockets, and voila! You’re ready to predict the future, one giggle at a time.
Challenge your kids to come up with the most outrageous fortunes possible. Who knows? Maybe they’ll predict that you’ll finally learn to moonwalk or grow a unicorn horn this year.
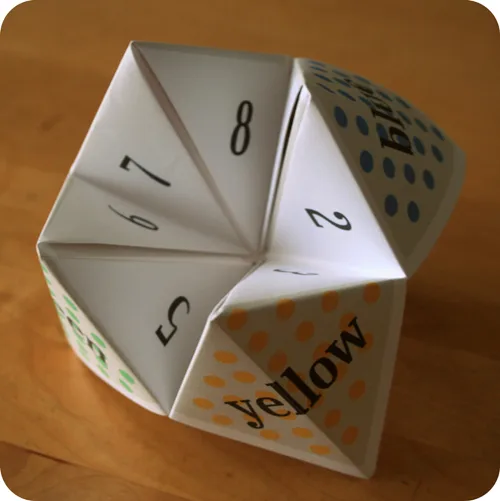 These paper fortune tellers are perfect for New Year’s Eve parties or just a fun afternoon activity. Plus, they’re a great way to sneak in some fine motor skill practice without your kids even realizing it. Sneaky parent win!
24. Mini Marshmallow Snowmen
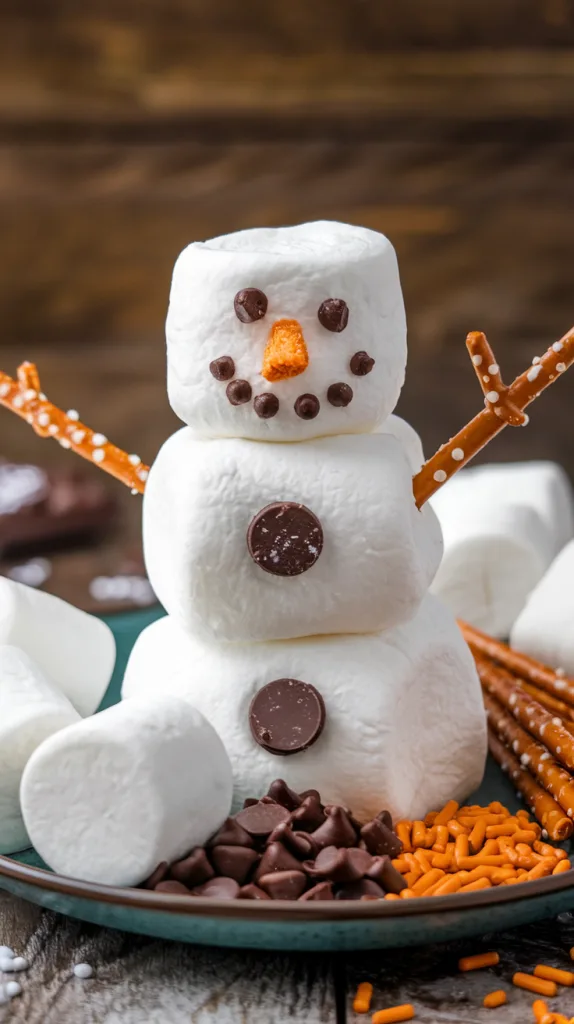 Ready to build the cutest, tiniest snowmen you’ve ever seen? Grab those mini marshmallows and prepare for a sugar-coated adventure!
You’ll need white mini marshmallows, toothpicks, and some edible decorations. Think chocolate chips for buttons, orange sprinkles for carrot noses, and pretzel sticks for arms.
Start by skewering three mini marshmallows onto a toothpick. Congratulations, you’ve just created the world’s most adorable snowman body! Now, it’s time to give your frosty friend some personality.
Use tweezers to carefully place chocolate chip buttons on the middle marshmallow. You might find yourself giggling as you try to balance these tiny morsels on your squishy snowman.
For the nose, gently press an orange sprinkle into the top marshmallow. Watch out – your snowman might sneeze! (Just kidding, marshmallows don’t sneeze… or do they?)
Now for the arms. Break a pretzel stick in half and poke each piece into the sides of your snowman. Look at those twiggy appendages ready for a mini snowball fight!
Want to get fancy? Use food coloring pens to draw on eyes and a mouth. Your snowman might end up looking surprised, confused, or perhaps a bit cross-eyed. It’s all part of the charm!
Line up your marshmallow army on a plate or use them to decorate cakes and hot cocoa. Just don’t leave them out too long, or they might stage a great marshmallow escape!
25. Disco Ball Suncatchers
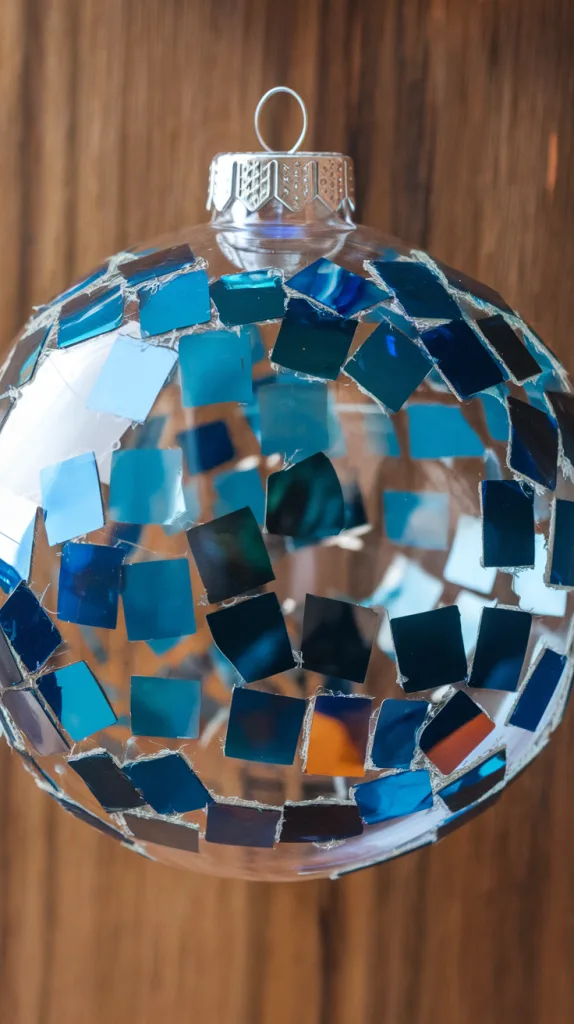 Ready to turn your room into a groovy disco paradise? Look no further than these dazzling disco ball suncatchers! You’ll be the coolest kid on the block with these shimmering decorations catching sunlight and spreading rainbows everywhere.
First, grab some old CDs you don’t use anymore. Don’t worry, we won’t tell anyone about your embarrassing boy band collection from the 90s. Cut them into small, irregular shapes using scissors (with adult supervision, of course).
Now comes the fun part! Arrange your CD pieces on a clear plastic ornament ball. Stick them on with a strong adhesive, making sure to leave some gaps for light to shine through. You’re basically creating a mini-mirror ball, minus the rotating motor.
Hang your disco ball suncatcher near a window and watch as it transforms your room into a magical light show. It’s like having your own personal dance party every time the sun comes out!
Want to take it up a notch? Make several of these groovy suncatchers and hang them at different heights. Your room will look like it’s straight out of Saturday Night Fever. Just don’t blame us if you suddenly feel the urge to break out your best disco moves.
These disco ball suncatchers are perfect for New Year’s Eve celebrations or any time you want to add a touch of sparkle to your space. Plus, they’re a great way to recycle those old CDs you’ve been meaning to get rid of. Who knew your outdated music collection could be so fabulous?
Crafty Materials Every Kid Needs
Stock up on these essentials to unleash your little one’s inner artist. You’ll need a mix of basics and sparkly extras to fuel their creativity.
Navigating The Glitter Apocalypse
Brace yourself, brave parent. Glitter is about to become your new frenemy. It’s the pixie dust of the craft world, sprinkling joy and chaos in equal measure.
You’ll find it everywhere – in your hair, on the cat, possibly in your morning coffee. But the smiles it brings? Priceless.
Pro tip: Invest in a good vacuum and embrace the sparkle. Your house might look like a disco ball exploded, but hey, at least it’s festive!
Remember, a little goes a long way. Unless you’re aiming for a full-body glitter experience. In that case, go wild and prepare for the sparkly aftermath.
Glue: Friend or Foe?
Ah, glue. The sticky situation you can’t avoid in crafting. It’s the unsung hero holding your kid’s masterpieces together – literally.
Choose wisely:
- School glue for paper projects
- Fabric glue for textile adventures
- Hot glue for instant gratification (adult supervision required!)
Warning: Glue has a mind of its own. It will find its way onto clothes, furniture, and possibly your eyebrows. Embrace the chaos and keep scissors handy for emergency hair-unsticking operations.
Remember, patience is key. Watching glue dry isn’t exactly thrilling, but it’s better than ending up with a soggy, floppy creation. Happy sticking!
Tips For Crafting With Kids
Get ready for glitter explosions and glue-stick shenanigans! These survival tips will help you navigate the wild world of crafting with little ones.
Keeping Calm During Sticker Overload
You’ve handed out sticker sheets, and now your living room looks like a disco ball exploded. Deep breaths! Embrace the chaos and remember – those shiny dots are memories in the making.
Set up a “sticker station” with wax paper as a base. This way, peeled-off stickers won’t permanently decorate your furniture.
Got a sticker fiend? Create a special “sticker book” for their collection. It’ll keep them busy for hours and save your walls from becoming avant-garde art installations.
Distributing Scissors: A Survival Guide
Handing out scissors to kids can feel like arming tiny ninjas. But fear not, brave crafter! You’ve got this.
Start with safety scissors for the littlest ones. They’re like training wheels for future crafting champions.
Establish a “scissors dance” – a silly ritual where kids practice opening and closing safely before each project. It’s fun and reinforces good habits.
Create a scissor return system. Maybe it’s a special decorated cup or a magnetic strip. Make it a game to see who can put theirs back first when finished.
Remember, if all else fails, there’s always tear-art! No scissors required, just enthusiastic ripping.